
Previewing the New Message Editor
- Software team

- Jun 1, 2021
- 3 min read
Updated: Mar 13
In this article, we will preview the new email message editor, now called Campaigns.

You can choose from one of many higher-education templates we provide, you can build your own from scratch, or you can use custom HTML code.
The new editor has all the features you are used to, and many new capabilities.
The email creation process comprises five steps:
Select a campaign type
Start the design process by choosing a Campaign Type. There are six campaign types to choose from. We'll review a Standard campaign, used a regular, one-off email, or combined into an automation, for illustration.

Let's review how to create a Standard campaign type. Remember, a "campaign" is a single email message.
The next step is to choose your audience. Select a list and a corresponding segment.
Choose your audience
In the example below, we choose the Prospective Students List and select a Segment, Prospects.

Note: This is different from the current email editor, where a segment is selected either within an automation workflow or after a single email is created.
Design
The campaign editor includes a top settings menu, a side bar with drag and drop options, and your design "canvas."
Embedded software tips
In the platform, you will see blinking green dots indicating "functionality" tips. These are helpful hints as you build your campaigns and automation workflows.

Top settings menu
Set your campaign message width and alignment and define your hyperlink color. You can adjust the background color and determine a "theme."
Themes are essentially color-coded tags to create different variations of the same template. Selecting colors will allow you to distinguish a template from the others easily.

Tip: Use color combinations from your institutional brand guidelines.
Undo and multi-user editing
Make a mistake? No problem. Click the Undo icon. Multi-user editing gives you the ability to see who else is currently editing the template.

Select the Gear icon to set or change your subject line, preview text, email sender, mobile responsiveness and more.

Side bar menu

With drag and drop functionality, add customized images from the Content Manager, buttons, text blocks, line breaks, spacers, and more.
Using the Video Block, add a URL address for your hosted video and define actions when your contact opens the video.
Predictive Content, a block where you add up to five variants of your text content, using different tones, verbiage, and length.
Through machine learning, we send the "variant" that your contact is likely to engage. We will cover this in depth in a future post.
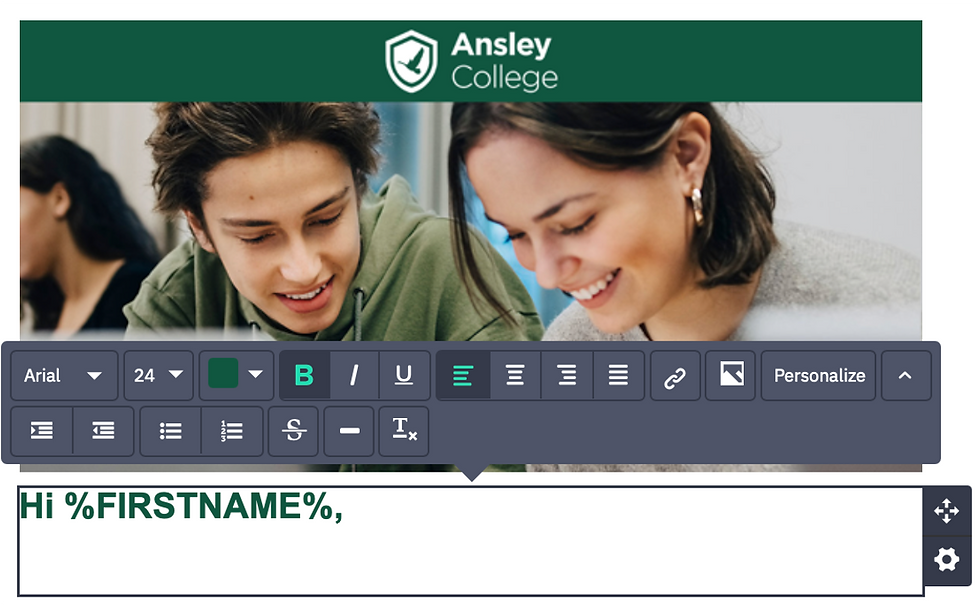
Add an Image Block from the Content Manager and drag and drop your first Text Block.
Personalize your text block with content attributes (%FIRSTNAME%), control the font type and size, and set your alignment.
Personalizations can be contact attributes, message attributes such as today's date, or a specific social icon, to name a few.

Add conditional logic to campaign blocks to change the image or content depending upon contact attributes. For example, change the academic major content depending upon the prospective student's major interest.
Message variables
Within conditional logic, or used as a single tag, message variables allow you to create a bank of reusable content to deploy across your campaigns. In addition to academic major descriptions, create message variable content for student life activities, alumni programs, typical responses to current students, or custom message footers.

Tip: Custom footers are a best practice. Instead of simply adding an unsubscribe link, remind your audience why they are receiving your campaign message and give them options to manage their communication preferences.

Campaign Summary
As a final step, you'll need to review the Campaign Summary page before you send or schedule your email.
On this page, you can:
Check your subject line, preheader text, and sender information
Check the list you are sending to
Select additional metrics to track
Schedule a send for a future date (or send immediately)
Send a test email
Preview your campaign
View spam check results
Send your email campaign
Once everything is reviewed and tested, you're ready to send the email. To do so, click the "Send Now" button.
You will then be asked to confirm your send with an option to cancel.

If you wish to schedule the send instead, scroll down to the "Schedule" section of the "Campaign Summary" page. Click the toggle to set it to the "On" position.
Then use the date and time dropdown fields to schedule your email. When finished, click the "Finish" button.
Review
The Campaign Message editor retains the features you are accustomed to, including drag and drop editing and conditional logic, and adds new design functionality, predictive content, spam check, and embedded Email and Desktop client preview.